Friday
Feb042011
Texas & Pacific baggage-express car
Here is an old diagram of a 70-ft Texas & Pacific baggage-express car that our T&P model is based on. Enjoy.
;)

Here is an old diagram of a 70-ft Texas & Pacific baggage-express car that our T&P model is based on. Enjoy.
Now, what would be ideal to help a model train manufacturer in finding paint matches for a specific prototype? I wish the various railroad historical societies could provide paint samples (on plastic!) for the various elements of their specific rail systems . . . that would go a long way.
 Email Article
 An enjoyable aspect of working here at Wheels of Time is documenting the prototype accurately. I am especially aware of the little details, details you'll see reflected on your Wheels of Time products. I find it especially satisfying when I find the prototype in real life. It certainly helps me develop accurate models! Here are some tips that I've learned in documenting a prototype.
;) 1) Take good field notes, even if it looks like chicken scratch. Here are my field notes for the SP American Car & Foundry bilevel coach built in 1957. You never find this level of detail from a magazine drawing. Taking good notes, I see things that otherwise I would miss. One such detail: the 1955 Pullman-Standard cars had wide shallow skirts around the center doors and slightly angled in A/C diesel-generator cabinet, in contrast to the ACF coaches.
1) Take good field notes, even if it looks like chicken scratch. Here are my field notes for the SP American Car & Foundry bilevel coach built in 1957. You never find this level of detail from a magazine drawing. Taking good notes, I see things that otherwise I would miss. One such detail: the 1955 Pullman-Standard cars had wide shallow skirts around the center doors and slightly angled in A/C diesel-generator cabinet, in contrast to the ACF coaches.
2) Use a measuring stick. It makes taking general dimensions easier since it will not flex or roll up like a measuring tape. It can give the relative scale of complex parts. My stick is a 3-ft PVC pipe with electrical tape, marked off at 3" and 1' increments.;)
3) A measuring tape is also a must for accurate dimensioning. Here is a measuring tape in relation to a PCC truck. I'm careful to measure how far things stick out.;)
4) Documenting the style, color, dimensions of the actual lettering is important. This one is from a B & O car.;)
5) Paint color can vary under different lighting conditions. Here is a VRE bilevel coach in the railroad shop. Having photos of the paint scheme in white lighting conditions can be helpful in finding the correct hue of the paint.
;)
;)
;)
;)
Etched into memory forever is the oscillating flash of the locomotive’s light, the hiss of air, the sound of tickets being punched, the clickety-clack of the rails, the sing-song call of the next stop, the squeal of brakes, a sea of humanity carried through the peak hours by a parade of 7- to 10-car trains. The commuter remembers the distinctive throb of the Fairbanks-Morse OP engine bringing us up to speed, the chant of the EMD 16-cylinder 567 prime mover ... even the sterile turbocharged whine of the EMD 20-cylinder 645. Watch your step! All aboard! Enjoy your ride into history. (And remember to reserve your set of bilevel commute coaches by 12/28/10.)
;) GP-9 accelerating out of Burlingame during the morning rush hour
GP-9 accelerating out of Burlingame during the morning rush hour;) Morning, June 1981, Train No. 129 enters 4th & Townsend with EMD GP40P-2 leading a train of 72-ft Suburban Coaches
Morning, June 1981, Train No. 129 enters 4th & Townsend with EMD GP40P-2 leading a train of 72-ft Suburban Coaches;) Morning train No. 43 rounding the curve for the last lap into the City ... bilevel coach shown is a 1968 Pullman-Standard built car
Morning train No. 43 rounding the curve for the last lap into the City ... bilevel coach shown is a 1968 Pullman-Standard built car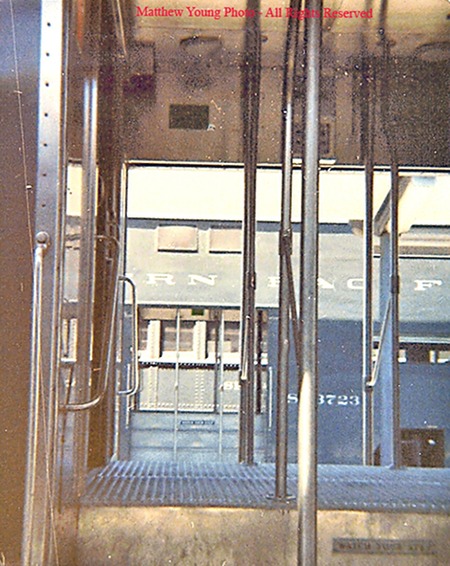 This was taken when I was a little with my 110 Kodak Instamatic Camera: Car No. 3723 is an ACF built 1957 bilevel coach that Wheels of Time is currently recreating (see http://wheelsotime.com/bilevel-commute-coach)
;) One of a kind Caltrain-painted-&-leased SP locomotive 3187 with bilevel coaches leaving in the afternoon
One of a kind Caltrain-painted-&-leased SP locomotive 3187 with bilevel coaches leaving in the afternoon;) Evening rush hour with SDP45 in command
Evening rush hour with SDP45 in command;) SP Train No. 42 rounding 7th Street with EMD SW1500 switching a set of bilevel coaches
SP Train No. 42 rounding 7th Street with EMD SW1500 switching a set of bilevel coaches;) Train No. 151 at San Jose waiting to leave for a night run up the Peninsula ... notice the portable red light that hangs on the metal gate
Train No. 151 at San Jose waiting to leave for a night run up the Peninsula ... notice the portable red light that hangs on the metal gate
We are shipping our 70-ft heavyweight baggage-express cars through next week. They look really nice. Yours truly is packing the orders. Our ADA Station Platform Warning Bands in HO- and N-scales are being made. Be sure to check out the bilevel commute coaches (reservations due at your dealer or direct by Dec. 28th). These bilevels will have really fine printing and painting with two-level seating, like the real thing.

WARNING: CHOKING HAZARD: Small Parts - Not for children under 14 years. Wheels of Time products are not toys and are not intended for children under 14 years.
Copyright © 2023 Wheels of Time. All rights reserved. Products bearing Missouri Pacific, Chicago & North Western, Denver Rio Grande & Western, Union Pacific, Southern Pacific and Western Pacific marks are made under trademark license from Union Pacific Railroad Company.